Find out what are the easiest methods for drying apples at home.
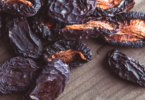
Drying or dehydrating is the best way to preserve and store fruit. Almost all fruit can be dried, including apples. Dried apples not only have a long shelf life, they’re also convenient and make for a delicious, low-fat treat you can enjoy anywhere.
Some dried fruit manufacturers add sugar to their dried apples, which adds nothing but calories to the fruit. Apples are naturally sweet and the drying process intensified that sweetness, so you don’t really need the additional sugar. Worried that the usual brand of dried apples you buy may contain too much sugar or other preservatives? Here are some ways you can dehydrate your apples at home.
Easy Methods for Drying Apples at Home
Drying apples with a dehydrator
Instructions:
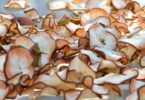
- Wash, peel and core your apples.
- Slice apples thinly and evenly (about ¼ inch)
- Soak the apple slices in the lemon juice mixed with 1 quart of water to avoid any browning.
- Shake off as much liquid as possible then place the slices on the dehydrator trays. Make sure to leave a little bit of space between the slices for air to circulate.
- Sprinkle a light dusting of cinnamon over the slices.
- Dehydrate at 135°F (57°C) for 6 to 8 hours.
- Check apples for any moisture. The slices should feel dry and leathery. The inside should look like a dry, dense sponge.
- Allow cooling for a few hours before storing in an airtight container.
You can store these apples in a cool, dry, and dark place for several months.
Drying apples in an oven
Instructions:
- Wash, peel, and core apples. You can also choose to leave the peel on.
- Slice apples thinly and evenly (about ¼ inch)
- Dip the slices in a solution of ¼ cup lemon juice and a quart of water. This will prevent them from browning.
- Remove the slices from the solution and pat dry.
- Sprinkle them with some cinnamon.
- Arrange the slices on wire cooling or baking racks and put them in the oven. You may also put the apples directly on clean oven racks.
- Set the oven at about 150° F (65° C). Prop the door open with a wooden spoon to let air circulate and moisture escape the oven.
- Bake for 5 to 8 hours. Cooking time may vary due to humidity, the type of oven you have, apple varieties, etc.
- Check apples for any moisture. Outside, they should feel dry and leathery. The inside should look like a dry, dense sponge.
- Allow cooling for a few hours before storing in an airtight container.
You can store the dried apples in a cool, dark place for several months. If you’re unsure about their dryness, store them in a freezer. Remember that case hardening occurs when the outside of food dries too quickly for the moisture from the center to escape because of drying with high heat. Use very low temperatures, unless you’re planning to eat your apples right away.
Drying apples in the Sun
Instructions:
- Cut the apples into thin slices. The thinner the slices, the easier it is to dry them.
- Soak the apple slices in a mixture of 1 cup of lemon juice and 1 quart of water. Do not soak them for more than 10 minutes.
- Drain the liquid from the fruit and sprinkle the seasonings over the slices.
- Cover the bottom of some shallow cooking trays with parchment or cooking paper then place the slices on them.
- Place the apples in the sun on a hot day. Keep them out as long as the sun is up. Cover the apples loosely with cheesecloth to protect them from bugs. Bring them in in the evening before the dew falls to keep mold from forming.
- Turn the apple slices over at least once a day for even drying. You should also turn them when you bring them in for the night.
- Spread the apple slices in the sun again and keep them out all day. They will probably be rather dry during the course of the day.
- When the apple slices are quite dry, place them in brown paper bags and hang them up in an airy dry place. You can also put them in airtight containers for storage.
Now that you’ve dried your apples, all you need to do is store them. There are a couple of ways to store dried apples.
How to Store Dried Apples
Storing in jars
Fill a glass jar with the dried apple pieces about halfway up. Take a wooden spoon and gently press down on the apples to compact them and remove air. Fill the jar all the way up with the apples, intermittently pushing them with the spoon as you pack them down.
Pack the apples down as much as possible and fill any extra space at the top before sealing the jar with an airtight lid.
Store the apples in a dark area that will stay at about 60° F, and they should be alright to use for up to a year. You can also store them in your freezer, which can double their shelf life.
Storing in plastic bags
Fill a gallon or quart zip bag with the dried apples. Pack them in as tight as possible into the bag.
Zip the bag sealed, gently squeezing the bag as you go to release any extra air.
Unzip the bag just enough for a straw to fit through, then stick the straw about an inch into the bag. Suck out any excess air that may be left. Pinch the straw closed as you slowly pull it out and zip the bag closed.
Store the bag in the freezer for two-year shelf life, or a cool, dry area away from life. Check on the apples every month or so to make sure they haven’t gone bad or gathered moisture.
To ensure that you get all the air out of your storage bag, use a vacuum bag sealer. If you’re going to use a metal can pack the apples in a zip bag before storing them in the metal.
READ ALSO: Step-By-Step: How to Store Dried Fruits at Home