There are several techniques of drying garlic or what is also called garlic curing. Garlic may also be further dried sliced or powdered. Good garlic drying starts from good planting and harvesting methods.
Tips on planting and harvesting garlic
Proper planting and harvesting is key in effectively drying garlic. Here are some quick tips:
- Cultivate varieties of garlic suited for drying and storage. Your best options are the Creole, Cristo, Elephant, Ivory, Silverskin, and Spring Wight varieties.
- Dig your garlic when the soil is dry. This means no watering for several days (at least a week) prior to harvesting. A warm day is a good time to harvest your garlic.
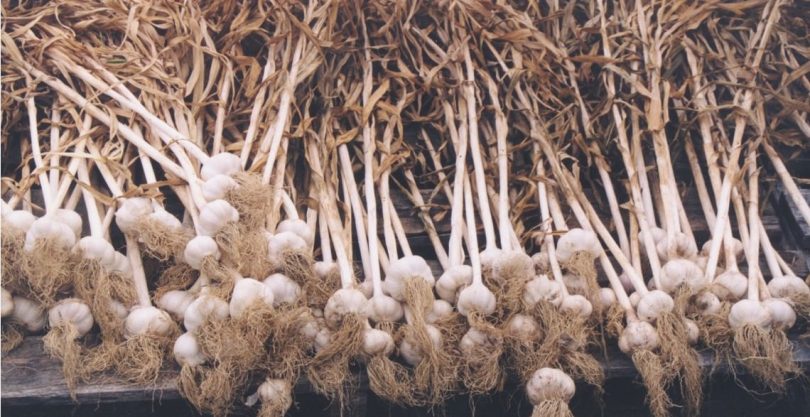
- Keep the stalks, roots and leaves attached. You should keep them intact even during the entire curing time.
- Don’t wash the garlic plants after they are harvested. Moisture will encourage mold growth. If dirt is your problem, you may just peel off a few layers of skin.
READ ALSO: 10 Amazing Benefits of Dehydrating Food
Easy Methods for Drying Garlic
Thoroughly drying garlic bulbs is necessary prior to storage because they are prone to sprouting. When exposed to high humidity, the bulb stem starts to form seed-heads which cause it to soften. It’s for this same reason that you should make sure they don’t get rained on.
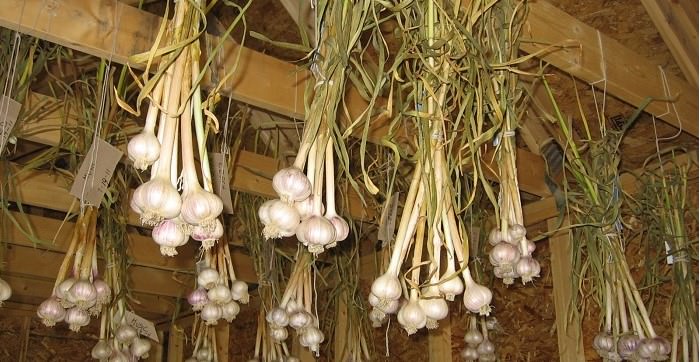
Method 1: Curing garlic bulbs
- Harvest your garlic when they have reached maturity. A reliable harvest indicator is when half the leaves are still green, and half have died off. The leaves start to die off from the bottom up.
- Choose a cool, well-ventilated, shaded place to cure your garlic. It should be no cooler than 50°F (10°C). Shaded spots outdoors are ideal places because of the steady stream of flowing air.
- Arrange the garlic plants in a single layer. You may use horizontal racks or vertical nets hanging around the walls of the shed. You may also braid them in a bunch and hang them from the rafters.
- Wait for one to two months for the garlic to completely dry. By the second month, the leaves would have turned brown and papery and the roots already shriveled and stiff.
- Trim the roots leaving ¼ of an inch from the base of the bulb. Cut as close as possible with one or two snips.
- Cut the tops off leaving an inch from the top of the clove. Do not remove skin and don’t cut too close for longer storage life.
- Keep your garlic cool and dry. Depending on the volume of your harvest, you may choose to place them in a cupboard or an outdoor shed. It’s very important that you keep them away from direct sunlight.
If high humidity is a problem, you may use the second method for drying garlic at home.
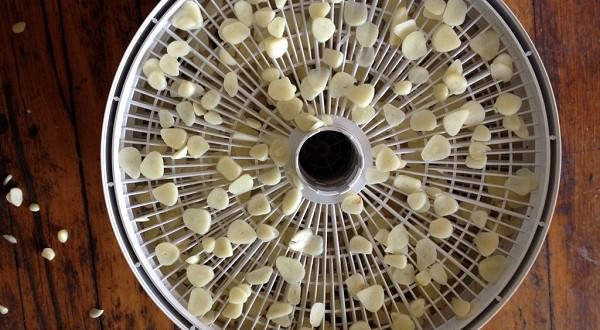
Method 2: Drying minced or sliced garlic
- Select the cloves that you intend to turn into minced dried garlic or powdered garlic. Avoid using cloves that are visibly bruised.
- Peel your cloves. Discard the papery skin or use them for compost.
- Put the cloves in a blender and pulse three times at most. If you want sliced garlic, cut them thinly by hand using a razor-sharp knife.
- When drying garlic in the oven, arrange the garlic on a baking sheet lined with parchment paper. Preheat the oven to 170°F (or to the lowest setting of your oven) and bake for at least 30 minutes. Check on your garlic once in a while and stir the bits to ensure that they are drying out evenly. After 30 minutes, remove the sheet from the oven and let cool. If needed, repeat the process. You’ll know that your garlic is completely dried when pieces break, snap, and crumble easily in your hand.
- When trying garlic in the dehydrator, set it at the maximum 115°F setting (45°C). If your dehydrator has holes in the racks, make your garlic slices larger.
- Dry your garlic for up to 48 hours. Higher temperature settings would require less drying time. If you want them crispy, aim for 2 days of drying at 115°F. Anything less than that would turn your garlic chewy.
READ ALSO: 6 Food Drying Methods – Pros, Cons and Best Tips
How To Store Dried Garlic
Here are a few effective ways of storing dried garlic.
Place the dried sliced or minced garlic in an airtight container, then store in your freezer. Your garlic will have a shelf-life of one year. To use in your food preparations, grind an amount you need using a blender or with a mortar-and-pestle.
You may also store dried garlic in a mason jar in your kitchen at room temperature. As long as you keep it away from direct sunlight and high heat, it should last for several months.
Turn your garlic pieces into garlic powder, good for sprinkling a kick of savory flavor to any dish from pizza to pasta. (You may also experiment on combining your garlic powder with chili powder, onion powder, and red pepper flakes to make a unique seasoning.)
Immediately after they have cooled, grind the pieces using a coffee grinder or food processor. Then using a fine sieve, sift the ground garlic to separate the fine powder from the remaining bigger pieces. Your garlic powder should last for two months.
Braiding garlic is a tidy way to store your garlic. Not only does it make for rustic kitchen décor, it also offers you the convenience in being able to pick a clove fast whenever you need one. Braiding can be a little daunting at first, but as soon as you learn the basics, you’d realize that it’s fun.
Drying garlic and storing it properly guarantees that your garlic remains as fresh and flavorful from the day they were picked.